My Globe

Website Visitor Counter

Saturday, November 29, 2008

Effect Siluet

At Photoshop this tutorial, we will try to study and studies a technique to make effect siluet. Siluet is light with strong intensity come from side back of the object, causing is created siluet affirming aspect form of object. In this tutorial will be explained about the steps in making effect siluet. Following this step by step for make the effects.


  1. Open the photograph file which has been provided in the form of file .TIFF. At pallet Layers, click double click background, then clicked OK to turn into normal layer of which can save information transparence. We needs to dissociate object from reasoning of with manipulation of contrast applies facility channels. Open Pallet Channels. Seen the pict1.

  1. Then compared level of third contrast of channel with click in each channel in rotation. Copies channel which saving the highest contrast (at this practice channel Green) with click icon triangle Channel Options > Duplicate Channel. Seen the pict2.

  1. At copy channel which often is called as alpha channel, darkens object with Burn Tool. At toolbar, select Range = Shadow. Seen the pict3 and the result can show by pict4.


  1. On the contrary at reasoning of made is bolder with sweeping Dodge Tool. At toolbar, select Range = Highlight. Seen the pict5.

  1. If the contrast between objects and background is a maximum, back of tone at copy channel with menu click Image > adjustment > Invert. Makes perfect contrast at part of which unsatisfying perfect by using Burn Tool and also Dodge Tool. Remembers, part of light at part of copy channel will be presented, on the contrary part of dark will be hidden. Pays attention to picture following in picture 6 and 7.


  1. Changes copy channel to become selection with button click Load Channel as Selection at underside pallet Channels. Seen the picture8.

  1. Click channel RGB, then opened pallet Layers. Click and activates layer.

  1. Click pallet Foreground Color and select black color. Contents of the color to object which has been selected with click menu Edit > Fill > use Foreground Color. Click OK. Seen the picture 9.

  1. Back of selection with click Select > Inverse, then threw away background with push the button Delete. Eliminates selection with click menu Select > Deselect. Looks at the picture 10

  1. Adds one layer to make dusk sky with click icon arrow Layer Options > New Layer. Click OK. Locates Layer at sequence is very under with dragging downwards. Sees picture 11.

  1. And then clicked pallet Foreground Color and select yellows color. Click OK. Click pallet Background Color and select rudling. Click OK. Click Gradient Fill Tool at toolbox, select type radial at toolbar. Resistant click at part of object chest, then dragged and discharges at corner to canvas. Sees the next picture 12.

  1. Adds one layer again to make the sun. Arrow button click Layer Options > New Layer. Click OK. Locates this layer among layer siluet and layer dusk sky. Looks at the picture 13.

  1. Form of selection is in the form of circle with Elliptical Marquee Tool. Resistant compress of button Shift clicking and drags mouse to form perfection circle. Applied feather that the sun boundary is not sharply with click Select > Feather and gives small value, for example 2 pixels. Click OK. Sees picture 14.

  1. Then clicked pallet Foreground Color and select orange color. Menu click Edit > Fill > use Foreground Color. Click OK. Eliminates selection with menu click Select > Deselect. Saves with click File > Save As. File name berry and saves in the form of file .JPEG. Click Save.


Protecting The Start Menu

Each time we install new software, name of software would be codified in menu "Start". To see software installed by that, click Start > All Programs and hereinafter, you will see all software which have been installed.

If there are others floodlights one of software or the folder there, then buttons mouse right and click option "Delete", hence losing name of software from concevutive menu "Start".

To prevent this thing was happened, we did protection so that there are no shortcut menu again when right button mouse is clicked. Its way, click Start > Run and write regedit at windows Run. Hereinafter we can select "HKEY_CURRENT_USER > Software > Microsoft > Windows > Policies > Explorer". After thus we can continue with click menu Edit > New > DWORD VALUE. Give a name "NoChangeStartMenu". Click Edit > Modify and at part "Value Data", filled with value 1. If all is completed Restart the computer.

Prevents Changing the Wallpaper

We would be annoyed very, if wallpaper which we took a fancy to sudden changed by friend or others who is using our computer. Changes wallpaper of course is not thing which difficult. We are enough by using Control Panel and whoever can change wallpaper in Microsoft Windows XP. However, there is a way that wallpaper we cannot be changed by giving protection. In this tutorial we can study about the way. So whoever is not possibly changes our wallpaper.

Its way is with click at Start > Run and writes down "gpedit.msc". Then we pushed Enter when we have completed. If we had entered at windows Paradox Runtime, we can continue by stepping into part of User Configuration > Administrator Templates > Control Panel > Display. Double click at part "Prevent changing wallpaper" Then, select "Enabled" and press OK when we reside in windows "Prevent changing wallpaper Properties".

That way wallpaper we would be safe from ignorant hand.


Lock Your Screensaver

Like is that we know, actually the function of the screensaver is to take care of monitor age remain to be long when we often leaves in aflame condition. The screensaver would be active if we leaved computer within certain.


In the development, the screensaver have been functioning widely. This time exactly becomes one of accessories which able to be replaced periodical. However becoming problems is a lot of incognito viruses to become screensaver. For civilian, fie-file this type considered to be a screensaver which besotted. But, after the file has turn on, it will become a serious problem that making confusion us.


To prevent such that thing happen, we can lock screensaver that others cannot change screensaver with other. They can not install new screensaver and implements it in our computer. Through, via this tutorial will be studied tricks this locking, so our computer will be free of screensaver is loading viruses.


Its way simple enough, click Start > Run and writes down "gpedit.msc", then press Enter. Click User Configuration > Administrative Templates > Control Panel > Display and double click at part "Screensaver executable name".


Select "Enabled" and enters file name screensaver which will be made screensaver our person which can be accessed by Windows XP at text box "Screensaver executable name". Usually, files screensaver earns we to find in folder c:\Windows\System32 with extension ".scr". If out of it, we must enter path file in complete, for example "c:\dokumenku\saver.scr". Compress OK many times to go out from the place. Now we pay attention to our computer with we look to Control Panel > Display and click tabs "Screensaver". We will not see any change with other screensaver.


Radiation Effect of Morning Sunshine

When light source stays near by horizon, a lot of exotic which can touch our feeling. Some things is earning we to do to make form of creativity in processing light is make radiation of morning sunshine, gold light nuance at the time of dusk, and siluet. As component of initial practice is how we make radiation of morning light.

Light lines would be codified manifestly if around object there is particle on the air, where form is looking like smoke or fog. We can make real impression at object which we would process. There are some initial step must be done. In this Photoshop tutorial we will studying about the way to make lighting photograph.

Following is stepping for the shake of step of yield radiation of morning sunshine in an object:

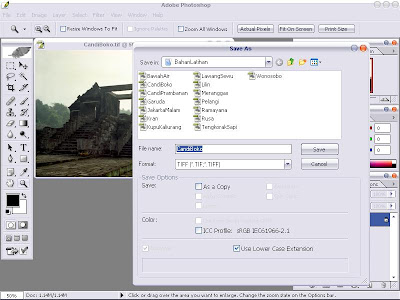
  1. What done beginning of is change picture format or object from file. JPEG to becomes file.TIFF like at picture under this. Its way is with opening file with formatting file .JPEG and saving with SAVE as and select format file .TIFF at format column under file name to storage box.This picture 1.

  1. Photograph open which has been kept by using format file .TIFF. Flat light was seen clearly so that doesn't dimension photograph. Celestial rear is artless relative object and contrast to object, so that easy to be detected.

  2. Step of hereinafter is choose method color range to select sky. We can do menu click Select > Color Range. At dialogue box Color Range, we can activate choice Selection, and gives maximum value (200) at Fuzziness, and click at part of the sky. And then click OK. Like this picture: Picture 2

  1. Copy of at part of sky which has been selected with menu click Edit > Copy. Hereinafter pastes up result of duplicity with click Edit > Paste. Make a new layer with click menu Layer > New > Layer. And pastes in new layer. Automatically, result of copy will be put down at new layer. Following this picture:Picture 3

  1. After result of copy placed at layer which is new, does distorting of celestial colour nuance from white become brass with clicking menu Image > Adjusments > Color Balance. At available dialog box Color Balance three parts that need to be changed the value, namely Highlight, Midtones, Shadow. Click Tone Balance Highlight and changes value Color Levels to become +100, + 100, and - 100. Click Tone Balance Shadow, and changes value Color Levels to become + 100, 0, and - 100, then clicked OK. Sees picture 4.

  1. Then we are radiation nitrogen of light from sky which has been manipulation its(the colour. Its way menu click Filter > Blur > Radial Blur. At dialogue box Radial Blur, select Method = Zoom, Quality = Best, Amount about 77 pixels. Shift center radiation about to right periphery, according to position of temple gate and click OK. So end result becomes like picture 5.

  1. If the radiation of light still less reality, copies celestial layer with click arrow icon Layer Option is starboard to pallet Layers, then select Duplicate Layer like picture 6.

  1. Then added one new layer in topmost sequence with clicking arrow icon Layer Options > New Layer. Like picture following.

  1. At dialogue box New Layer, select Mode = Hard Light, and activates choice Fill with neutral color 50% gray, and then clicked OK. Sees picture 8.

10. Gives dazzled effect of light (flare) with clicking menu Filter > Render > Lens Flare. At dialogue box Lens Flare, select Lens Type = 50-300 mm Zoom, value Brightness about 77, and locates central point flare about on course corner to temple gateway. And then click OK. Sees picture following.

11. Saves result with clicking File > Save As. File name berry and saves by using format file .JPEG. Click Save.

See You To Next Photoshop Tutorial!!!


Introduction of Photoshop

Photography comes from word photos and graphein is meaning light and picture. Meaning of photography is draw with light. Photoshop has job activity principle by using photography job activity ground and photograph laboratory. Equally, Photoshop is a program applied to draw by using light. Difference happened only when the activity is done. Photography is process light when artistic worker dealt with light phenomenon. Photoshop has role after light phenomenon is recorded.

However, ably Photoshop earns also functioned to imitate light phenomenon at photograph record. Which we require is creativity in stringing up step for the shake of step and merger various tools Photoshop to present imitating light phenomenon of our photograph. Difference happened only when the activity is done. Photography process light when artistic worker dealt will looks out with light phenomenon. Photoshop has role after light phenomenon is recorded.

However, ably Photoshop earns also functioned to imitate light phenomenon at photograph record. Which we require is creativity in stringing up step for the shake of step and merger various tools Photoshop to present imitating light phenomenon of our photograph. There is something else assumed require to be paid attention, namely illumination logic. This thing is like concentration of light, direction of shadow fall, concentration of shadow and other. Artificial of light phenomenon is made as fair and possible natural so that audience is remaining to be balmy in enjoying the visual masterpiece.

Real reality or artificial, now has next to nothing from the boundary. Reality incursion artificial applies processing and manipulation of digital photograph often is assumed reality than reality realities. Time has come we are not only becomes audience in reality lake yes this has just. We are to becomes part of our dream compiler and idea into visual masterpiece of which can be enjoyed by others and invites them enjoy dream we are a real something pleases. Even can more pleasingly from masterpiece in aesthetic and ethical method.