When light source stays near by horizon, a lot of exotic which can touch our feeling. Some things is earning we to do to make form of creativity in processing light is make radiation of morning sunshine, gold light nuance at the time of dusk, and siluet. As component of initial practice is how we make radiation of morning light.
Light lines would be codified manifestly if around object there is particle on the air, where form is looking like smoke or fog. We can make real impression at object which we would process. There are some initial step must be done. In this Photoshop tutorial we will studying about the way to make lighting photograph.
Following is stepping for the shake of step of yield radiation of morning sunshine in an object:
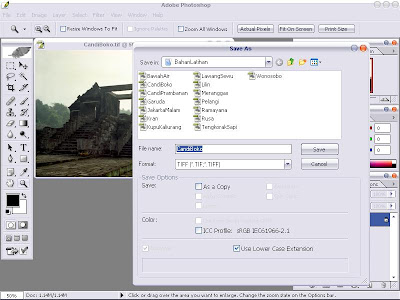
What done beginning of is change picture format or object from file. JPEG to becomes file.TIFF like at picture under this. Its way is with opening file with formatting file .JPEG and saving with SAVE as and select format file .TIFF at format column under file name to storage box.This picture 1.
Photograph open which has been kept by using format file .TIFF. Flat light was seen clearly so that doesn't dimension photograph. Celestial rear is artless relative object and contrast to object, so that easy to be detected.
Step of hereinafter is choose method color range to select sky. We can do menu click Select > Color Range. At dialogue box Color Range, we can activate choice Selection, and gives maximum value (200) at Fuzziness, and click at part of the sky. And then click OK. Like this picture: Picture 2
Copy of at part of sky which has been selected with menu click Edit > Copy. Hereinafter pastes up result of duplicity with click Edit > Paste. Make a new layer with click menu Layer > New > Layer. And pastes in new layer. Automatically, result of copy will be put down at new layer. Following this picture:Picture 3
After result of copy placed at layer which is new, does distorting of celestial colour nuance from white become brass with clicking menu Image > Adjusments > Color Balance. At available dialog box Color Balance three parts that need to be changed the value, namely Highlight, Midtones, Shadow. Click Tone Balance Highlight and changes value Color Levels to become +100, + 100, and - 100. Click Tone Balance Shadow, and changes value Color Levels to become + 100, 0, and - 100, then clicked OK. Sees picture 4.
Then we are radiation nitrogen of light from sky which has been manipulation its(the colour. Its way menu click Filter > Blur > Radial Blur. At dialogue box Radial Blur, select Method = Zoom, Quality = Best, Amount about 77 pixels. Shift center radiation about to right periphery, according to position of temple gate and click OK. So end result becomes like picture 5.
If the radiation of light still less reality, copies celestial layer with click arrow icon Layer Option is starboard to pallet Layers, then select Duplicate Layer like picture 6.
Then added one new layer in topmost sequence with clicking arrow icon Layer Options > New Layer. Like picture following.
At dialogue box New Layer, select Mode = Hard Light, and activates choice Fill with neutral color 50% gray, and then clicked OK. Sees picture 8.
10. Gives dazzled effect of light (flare) with clicking menu Filter > Render > Lens Flare. At dialogue box Lens Flare, select Lens Type = 50-300 mm Zoom, value Brightness about 77, and locates central point flare about on course corner to temple gateway. And then click OK. Sees picture following.
11. Saves result with clicking File > Save As. File name berry and saves by using format file .JPEG. Click Save.
See You To Next Photoshop Tutorial!!!


